Tuesday, February 26, 2013

We're In a Book!


Yeah!  Elephant and Piggie's We Are in a Book is a great book to use to springboard a great writing lesson with your students to teach the parts of a book!  I worked with first grade on this unit.  We used the fiction book to learn all about the parts of a fiction book:  front cover, title page, author, illustrator, publisher, place of publication, spine, and call number.  I then told the kids we were going to put ourselves in a book just like Elephant and Piggie did!  First, we also had to learn about the parts of a nonfiction book.  I took a picture of the class and told the kids that we were going to be in a book that we wrote together about a topic of our choice.  We learned about the table of contents, headings, subheadings, bold words, index, and glossary in nonfiction text.  We labeled each of the parts of the nonfiction book using a big book so each feature was easy to find.  We made a chart showing how each part of the nonfiction book helps the reader comprehend the text.  It looked like this:


After we learned all about the parts of a nonfiction book, we brainstormed what we wanted to write about as a class and voted on the most popular choice.  Then, we listed the major headings we wanted to cover in the book.  We also listed two subheadings that told more specific information about each of the headings.


I divided the kids up in teams with clipboards and paper to write about each of the subheadings.  After the teams finished their writing, I asked them to go back to their text and highlight words that the readers may need to have defined in the glossary of the book.


I then took all of the student work and typed it up into a SMART Notebook file for our SMART board.   That way we could work with the file as a group.  We then went back and added speech bubbles with the students' explanations of each of the parts of the nonfiction book.  They explained to the reader in the speech bubbles how the table of contents, headings, subheadings, index, and glossary help the reader as they are reading a nonfiction book.  I popped pictures of the kids into the story so it looks like they are saying what is in the speech bubbles.
I printed off a final copy of the class book in color and laminated and bound the book so each class could each keep their published copy in their classrooms.

Seusstastic mystery in the library!

I'm so excited about sharing this idea that came to me when planning my Seuss activities for next week!
I have to admit...I always have a hard time preparing for Read Across America.  This year, I decided to kill two birds with one stone.  I am wanting to introduce my 1st through 3rd grade students to mystery books.  I've staged mysteries in the library before and the kids LOVE it!  I got the idea from two AMAZING teachers in our school who both like to create the crime scene that the students have to gather clues from to try to solve the mystery.  Suspects are introduced and they all have an alibi that students have to read.  They then decide who they think is guilty of the crime.  

This year I decided to incorporate Suess' birthday with my mystery unit.  I visited my sixth grade classes and asked them for their help.  I took all of my Seuss characters and asked the students to work together to write up a mystery complete with a problem, a crime scene, suspects using the Seuss characters, and alibis.  Our sixth grade reading teacher sweetened the pot by offering extra credit for students who decided to take on the challenge.  I asked students to have their mysteries written up complete with alibis by Friday so I can choose my favorite and get all the supplies that the winning team needs to set up their crime scene in the library on Monday morning before the kids get to school!  I am so excited about this and I think the kids will be, too.

Tuesday, February 12, 2013

Book Fair Insider


My first article came out today in the Scholastic Book Fair Insider!  Click here to read the February edition. I'm excited about sharing all of my best book fair tips in this article.  You can also check out my Pinterest Story Laboratory board for pictures of book fair ideas for this season.  Between the two, you'll have everything you need to host a successful book fair event!

Monday, February 11, 2013

Timer Tools


This timer is my new favorite tool in the library!  On busy days, I see six classes.  That's six times you have to give a five minute checkout announcement and six times you have to ask your class to line up.  It gets very repetitive.  This timer magically fixes everything!  Just let your kids know ahead of time that you are going to set the timer to go off when checkout time is over.  Slide the clock to the designated amount of time your kids have to checkout.  They love watching the time countdown on the clock.  I tell the kids that when the timer beeps four times, they need to either be lined up at the library door ready to head back to class or lined up for checkout.  When the timer goes off, all of the students line up and I don't have to say a word!  This is a staple every librarian needs in their library!
The kids are so used to it that when I forget to set it, they remind me.
Check them out here.

Tuesday, February 5, 2013

Positive Reinforcement Heaven

I found this idea on Pinterest and tweaked it a little bit to work as a behavior reinforcement in our library.  So far, it's been very popular with all of my classes!  I took ten paperback Scholastic books from our recent book fair and from Scholastic book orders.  I bought ten cheap cups at the store and put the title of each book on a cup.  I also placed a basket with small slips of paper and a pencil on the table.  


I tried to make sure to place a variety of genres and reading levels on the table.  I introduced each class to the table and how it works.  Students who display appropriate library behaviors may be asked to go to the table, write their name and teacher on a slip, and place their slip in the cup of their choice at any time during library time.  I choose students for following directions, participating in class, listening and respecting the teacher and other classmates, and reading quietly during checkout time at the end of class.  It can also be used to brag on a student who is lining up quietly at the end of the class time.  I find that when I ask a student to go to the table, everyone is very on task.  At the end of the month, I will draw one name from each cup, announce the winners on the morning announcements, and each winner will get to keep the book.  It will be super easy to replace the books monthly with paperback books from Scholastic Book Club fliers.  I will keep the titles high-interest so that the students will continue to be excited about this incentive program.  

Saturday, February 2, 2013

Me References


I've got to give credit to a fabulous fellow from the Middle Tennessee Writing Institute for this idea.  Kelly Cleveland shared this idea with our group this summer.  Teaching 2nd and 3rd grade students about reference books is so much easier when they get to write about themselves!  We introduced one reference at a time and included the dictionary, thesaurus, atlas, and encyclopedia.  After each reference is taught, the students create an entry for that reference all about themselves.  After each reference page is created, the students add a front cover, title page, and table of contents for their books.  Here are a few pictures of our student work in process:


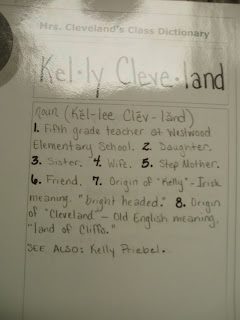
Here are a few pictures of Kelly's examples that she shared in class this summer. 


Here is an example of a dictionary page.  Our dictionary page included  syllabication, pronunciation, and the part of speech for the student and their name.  I also created a box for a picture of the student.  The students had to think of at least five ways to define themselves.  My favorite from a second grader was, "future big sister!"  If the student knew the origin of their name, they also included it.


Here are two examples of a thesaurus page.  I had the kids list four adjectives that described themselves.   They then had to use a thesaurus to look up synonyms and antonyms for those adjectives.  


Four our atlas page, I printed a blank copy of the United States from Enchanted Learning.  I gave each student an atlas and they used the political map of the United States to label what they wanted about themselves using symbols on the map.  They had to create a key for the map so the reader could understand what the symbols meant.  Some of the topics the students chose were:

  • places they've lived
  • where they were born
  • where they'd like to visit
  • where relatives live
  • places they haven't visited
  • places they have vacationed


Before creating an encyclopedia page, I had the students study entries in the encyclopedia and tell me how they were formatted.  They noticed that the year the person was born and died were in parentheses.  They also noticed the headings that helped the reader know how the information was organized.  They said that the information was in order like a timeline in the encyclopedia.  We also discussed that you don't have to be dead to be in the encyclopedia and it is not likely that you will find your mom in it, either! 
When publishing their encyclopedia page, I had the 2nd and 3rd grade students choose three headings that would tell about their life and accomplishments.
We also used this opportunity to compare the encyclopedia in print and the encyclopedia online.
The Tennessee Electronic Library offers World Book for free to any resident in Tennessee, so we compared with World Book Online.

Nonfiction Mentors in Action!


So many things have happened since my last post!  I wrote a grant to collaborate with nonfiction authors as mentors for my students' research.  We received $1,500.00 to videoconference with our authors!  We are going to use the Authors on Call that I blogged about in my last post.  Vicki Cobb is going to be our resident nonfiction expert and will begin Skyping with our kids this week!  Before I wrote and entered the grant, I tried out the nonfiction mentor unit with one group of fourth grade students.  They were my guinea pigs!  I learned a lot the first time around and worked with Middle Tennnessee's Center for Educational Media and videotaped our experience.  You can find it here:  MTSU Center for Educational Media.

When you visit the link for the Center for Educational Media, scroll down until you find the video called, "Using Authors as Mentors for Research." That's us!

I'm excited about receiving the grant and being able to work with Vicki Cobb.  We have set up a wiki
and will post all of the details about our experience together there.  This is my first time working with a wiki, and I love it!  We will be able to post student work examples and the students will post questions they have for Vicki on the wiki as they research.  It will also be available in years to come so we can duplicate the project.  Click here to check out our wiki and check in often to see our updates about the project.